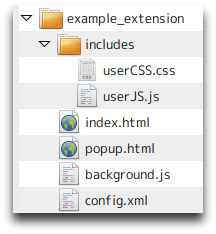
Opera扩展:目录结构
基本规则:
扩展必须有 config.xml 文件;
扩展必须有一个在后台执行操作的文件(通常是一个 index.html 文件);
注入脚本必须放到 includes 文件夹下;
所有文件必须打包进一个 zip 压缩包中,并将压缩包后缀名更改为 .oex
config.xml
我们需要一个 config.xml 来描述扩展的名字、描述信息和作者信息。这个文件采用 W3C 标准饰件的格式。如果没有这个文件,那这个扩展啥都做不成。
<?xml version="1.0" encoding="utf-8">
<widget xmlns="http://www.w3.org/ns/widgets">
<name>Slashdotty</name>
<description>隐藏 Slashdot 的侧边栏模块。</description>
<author href="http://people.opera.com/danield/">Daniel Davis (@ourmaninjapan)</author>
</widget>
includes 文件夹
includes 文件夹里包含的 js 被叫做注入脚本,也就是最后会应用到网页里的脚本。和 opera 的 userjs 一,样可以设置脚本的适用范围。
// @include http://slashdot.org/*
// @include http://*.slashdot.org/*
index.html
每个 Opera 扩展都需要一个 index.html,作为扩展的入口,也是后台操作的容器。例如构建扩展本身的ui,例如创建工具栏按钮、创建右键菜单等。下面的代码创建了一个工具栏项目,包含了一系列属性,如一个 18×18 的图标、消息提示、以及一个弹窗和弹窗的弹出属性。
<!doctype html>
<html lang="en">
<head>
<script>
window.addEventListener("load", function(){
var theButton;
var ToolbarUIItemProperties = {
title: "Hello World",
icon: "hello-button.png",
popup: {
href: "popup.html",
width: 110,
height: 30
}
}
theButton = opera.contexts.toolbar.createItem(ToolbarUIItemProperties);
opera.contexts.toolbar.addItem(theButton);
}, false);
</script>
</head>
<body>
</body>
</html>
当然, index.html 里面用到的 helllo-button.png popup.html 也就需要创建在扩展目录下了。
标签:扩展